Stitchtember - Day 25 - Feather Stitch
- Hannah Burbury
- Sep 25, 2023
- 2 min read
The feather stitch is a decorative stitch which can be work in straight or curved lines. It's perfect for vines, branches and stems. Other embroidery stitches can also be worked with the feather stitch too. Use French knots on the end of the stitches to look like flower buds and use lazy daisy stitch to resemble leaves.

Feather stitch tutorial
Materials:
· Fabric – cotton or linen fabric works well. I used osnaburg fabric which is 100% seeded cotton, but you can use any spare fabric you already have.
· Stranded embroidery thread
· Needle
· Scissors
Optional:
· Embroidery hoop
During this tutorial I am using osnaburg 100% cotton seeded fabric, DMC stranded cotton embroidery thread, a hand embroidery needle and a 5” DMC beechwood embroidery hoop.
1. Start by drawing four vertical parallel lines on your fabric using a heat erasable or water erasable pen.

2. Thread your needle using stranded embroidery thread and tie a knot at one end. For this tutorial I am using four strands of DMC stranded embroidery thread. You can choose how many strands of thread you would like to use.
3. Bring your needle up through the fabric from the back of the fabric to the front at point 1.

4. Insert your needle into point 2. Pull the needle through the fabric, leaving a loop of thread on top of the fabric.

5. Bring your needle up through the fabric at point 3.

6. Pull the thread through until a ‘V’ shape stitch forms.

7. Insert your needle into point 4, ensuring this point is in line with the end of the previous stitch.

8. Leave a loop of thread on top of your fabric and bring your needle up at point 5.

9. Gently pull the thread until a ‘V’ shaped stitch forms.

10. Insert your needle into point 6, ensuring this point is in line with the end of your last stitch. Pull the needle and thread through the fabric, leaving a loop of thread on top of the fabric.

11. Bring your needle back up at point 7.

12. Gently pull the thread until a ‘V’ shaped stitch forms. Repeat this process until you reach your desired length of feather stitch.

12. Secure the last 'V' shape with a small stitch.

13. Remove the pen lines using an iron or water.
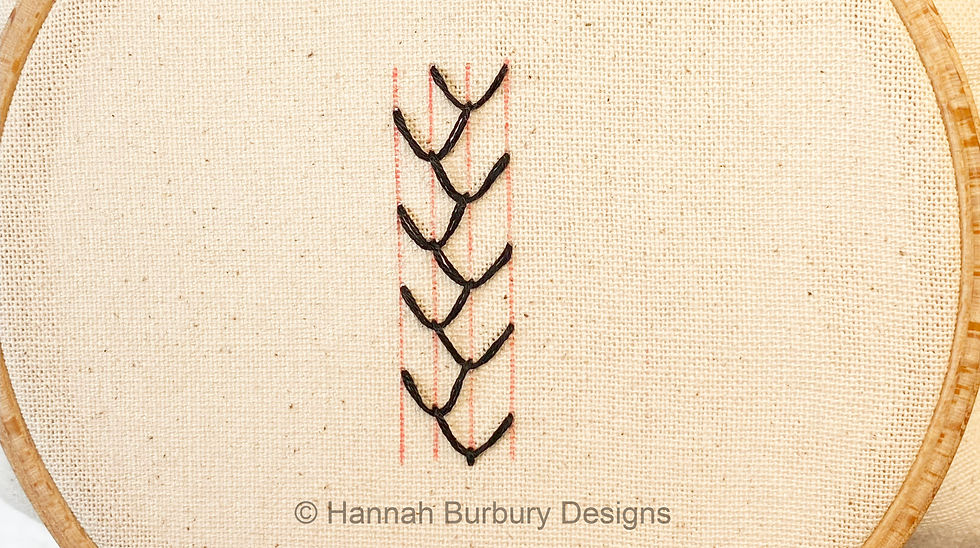
14. The feather stitch is complete.

Feather stitch top tips
· Vary the distance between the parallel lines to create a wider or narrower feather stitch.
· Try working the feather stitch in straight and curved lines.
· Incorporate other embroidery stitches with the feather stitch.
Feather Stitch Video Tutorial
Happy stitching!
Hannah x


Comments